Playing music on your Sticky Keys on a Roland Keyboard can be a wonderful involvement with general, yet very frustrating in the event that one of the keys stalls out and fails to create sound appropriately or at all. This frequently is the consequence of a messed up mechanical piece underneath the key. It can happen with the wear of purpose. You can open the piano to check for broken parts and replace them.
I have a roland Ep 9 digital piano and the issue was the keys were extremely hard to press at whatever point I started playing and there was a clicking clamor while squeezing AAE Error 6117. These keys use grease to be played without a hitch, so I chose to repair it and share it with you because I have heard that sharing is caring.
Clearly an authoritative diagnosis and repair estimate would require professional inspection, however I can’t help thinking that an issue causing discontinuous malfunction of the SAME E key in impliedly EVERY octave in a particular range “above center C” on the keyboard is intended for the point that I can’t imagine a great many potential causes existing.
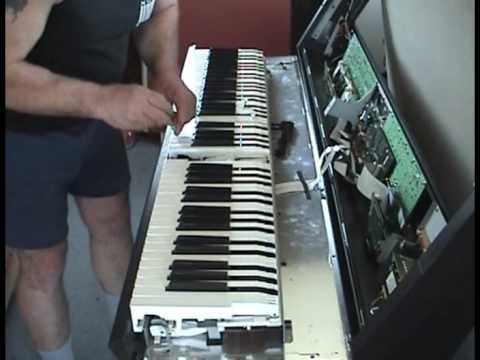
Turn off the Sticky Keys on a Roland Keyboard. Unscrew the screws on the rear and back that safe the back cover with a Phillips screwdriver. Lift up back piano cover. Locate the wrecked key and pry it out. Check underneath for the white hammer that drives the mechanical motion. Take it out to check whether it is to be sure broken.
Have Professionals to Repair Your Keys
Contact your local Kawai dealer assuming your piano is still under the one-year labor warranty. Contact Kawai straightforwardly at (310) 631-1771 in the event that your local dealer cannot help.
Adhere to the instructions given by your dealer or Kawai representative to package your piano for delivery to the facility.
Check your local phone book for piano repairmen or specialists in the event that your piano is as of now not under warranty.
Repair Keys on Your Own
Open the top of your Sticky Keys on a Roland Keyboard. Eliminate the upper part of the piano by lifting it back, then, at that point, eliminate the lower front cover with a screwdriver or by pulling it down. Detach the bottom panel over the pedals by releasing the metal switch under the piano and pulling the cover toward you.
Eliminate the wooden key that connects to the hammer in the top of the piano by utilizing the tip of your finger to push it up and out. Add paste to the crack in the messed up key utilizing a toothpick and press the parts solidly together.
Use scissors and sandpaper to cut and sand flimsy bits of wood into rectangular shapes the same width of the key. Make the patches paper dainty so as not to add a great deal of weight to the key.
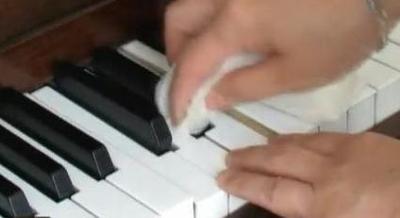
Presently Disassemble a white key and as shown in the image you will see old and sticky grease there which causes the difficulty of clicking commotion and hard to squeeze keys. Eliminate the old grease with Isopropyl alcohol swabs which I utilized and apply new grease to make them work without a hitch.
How would I fix sticky keys on my electronic piano?
Keys may become unstick as you squirm your fingers through them all over delicately. You can take a stab at pushing down the keys that adhered and others adjacent to them. You can release the Sticky Keys on a Roland Keyboard by utilizing a flathead screwdriver. Embed it tenderly between keys that stuck, divide them and wind it marginally.
How would I fix staying keyboard keys?
- Obtain a container of alcohol, preferably isopropyl or something almost identical. …
- Switch off the PC.
- Turn off the keyboard.
- Tenderly eliminate the inoperable keys. …
- Dampen a cotton swab with alcohol, then, at that point, utilize the swab to clean the keys and uncloggers.
How would you clean a sticky piano keyboard?
Is there a strategy for getting gunk and soil off piano keys? Assuming they’re plastic, rub them with a chamois fabric plunged in vinegar blended in with warm water. In any case, assuming that they’re ivory, utilize a barely damp material and a touch of delicate soap to wipe (don’t allow dampness to leak down the sides); dry ASAP.