Basically right-click My Computer and select Properties and you will be given a synopsis perspective on the equipment and operating framework that is presently Check Processor Generation in Windows 7. The information includes in addition to other things which processor it is you’re running yet the processor is referenced by the name it was sold/showcased by.
If you have any desire to purchase another PC or laptop, it’s useful to understand what CPU you have and how quick it is, or what generation is your Intel processor in Windows. In this article, you will figure out how to check the generation of your PC or Laptop on Windows 10, beneath you will find 2 methods for doing that.
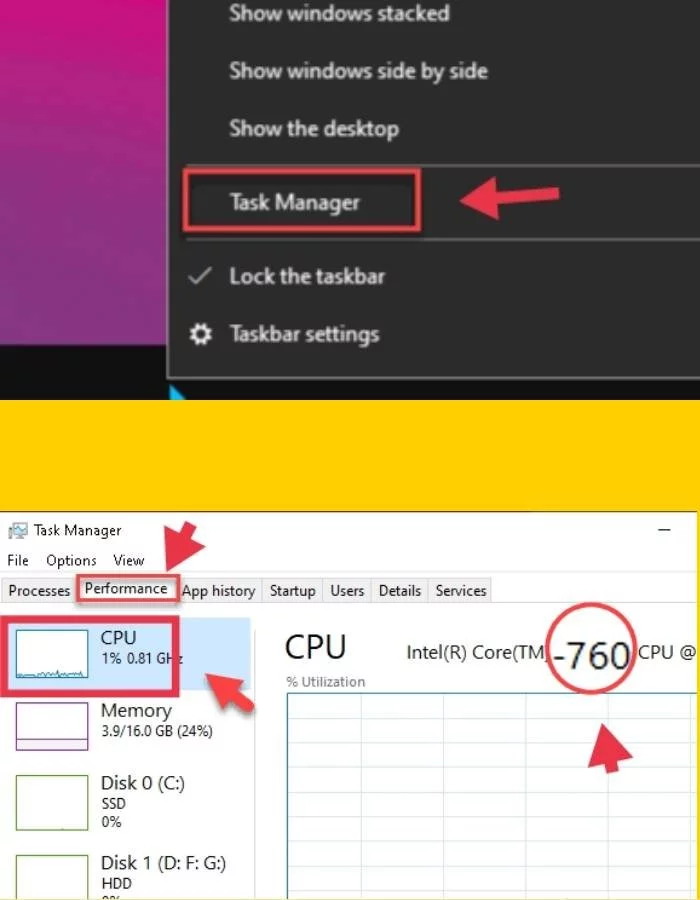
To begin, right-click your taskbar and select Task Manager. Then, tap on the Performance tab and snap on CPU. Here you can find the subtleties of the Check Processor Generation in Windows 7. For instance, in the screen capture underneath, 7th is the number after i5 basically is the generation of my laptop or PC.
Assuming you were trying to choose which chipset has the best worth, we would find a PC with an i7 chipset that is two or three generations old. For instance, in the event that the ninth generation is out, search for a 7th generation chipset. We think that choice demolishes the i3 and i5 like clockwork.
In the event that you have a laptop or desktop framework running Remove Windows From Dual Boot Ubuntu or above, you can check what processor is installed on your framework. Just right-click My Computer and select Properties and you will be given a rundown perspective on the equipment and operating framework that is at present set up.
Check generation of the processor of my laptop:
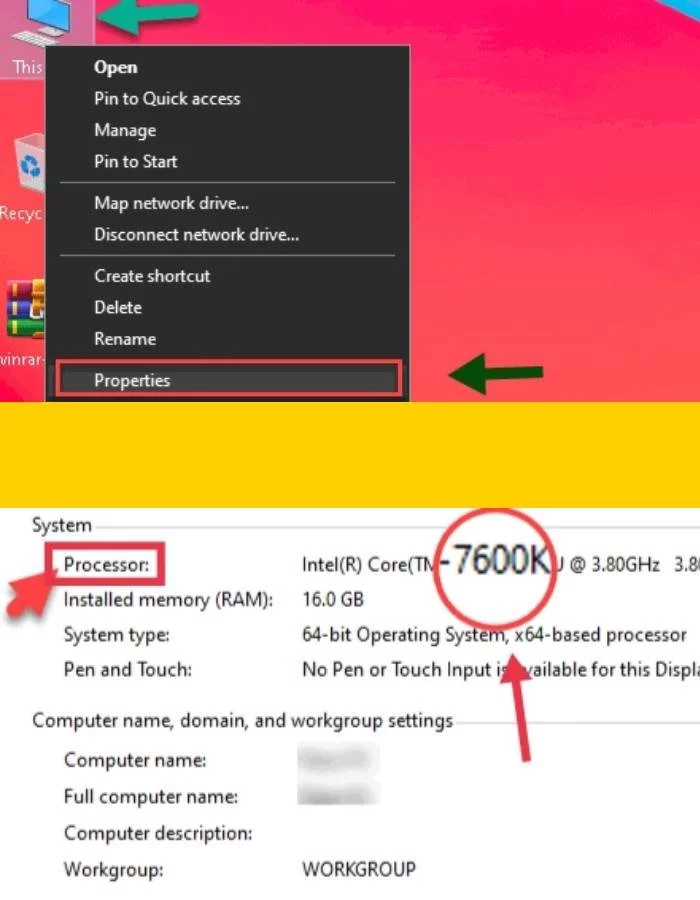
- Right-click on “This PC” or “My PC symbol” on your desktop.
- Click properties from the menu.
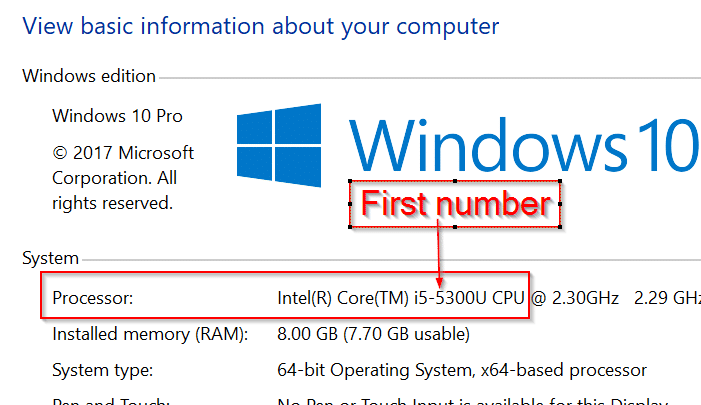
- Search for “processor” under the framework segment. It will show something like “Intel(R) Core (TM) i7-3520M CPU @ 2.90GHz.” The number at the place of this intense 3 will be the generation of your laptop’s processor.
Contrasts Between Generations of a Laptop or PC
Generation” alludes to the age of the CPU. The contrast between various Check Processor Generation in Windows 7 can be in recurrence, power utilization, lithography, store sum, denomination and number of centers and strings, upheld instructions, utilized spaces, upheld RAM, PCI-quick channel number, integrated illustrations, voltage control The acknowledgment of the gadget, etc. The exhibition is unique, yet not what anybody anticipated.
Each generation consumes more energy all the more effectively, produces less intensity, etc. Thusly, the seventh-generation laptop will be a lot thinner than the fourth-generation laptop.
2 Ways to Check the Generation of your PC or Laptop on Windows 10
Here, I’ll show you 2 unique ways which you can use to be aware and find the generation of a laptop or PC.
1. How to Know the Generation of your Laptop or PC through Properties
In the event that you have a laptop or desktop framework running Windows 7 or above, you can Check Processor Generation in Windows 7 of your Intel processor by following the underneath steps:
You can check or find it by basically right-clicking on My Computer and selecting Properties and You will get a synopsis perspective on the presently designed equipment and operating framework. This information includes the processor that you are running, yet the processor is referenced by its deals/marketing name.
- Right-click on My Computer or This PC and tap on Properties.
- Presently, you can see your processor and the main number after i3, i5, or i7 is just the generation of your laptop or PC. For instance, in here, my current chipset is the i5, 7th generation Under the System area. In the screen capture beneath, 7th is the number after i5 thus, the generation of my laptop or PC is 7th.
This number can be from 1 to 9. This indicates your generation can be anything from 1 to 9.
2. How to Find the Generation of a Laptop or PC using the Task Manager
You can find point by point CPU information like the generation and a lot more in Windows 10’s Task Manager. To find that Right-click on your taskbar and select “Errand Manager” or basically use Ctrl+Shift+Esc to send off it. Tap on the “Execution” tab and pick “Central processor.” The name and speed of your PC’s CPU will show up here.
This is the way to check the generation of your laptop using Task Manager in Windows 10:
- To begin, right-click your taskbar and select Task Manager.
- Then, tap on the Performance tab and snap on CPU. Here you can find the subtleties of the Intel Processor and Generation. For instance, in the screen capture underneath, 7th is the number after i5 essentially is the generation of my laptop or PC.
Conclusion
These are 2 methods for finding or check the generation of your PC or laptop by using the PC Properties and Task Manager. You can get nitty gritty information about your PC and laptop. It would be useful to be familiar with Intel’s processors and generations, particularly in the event that you’re looking to purchase a PC or laptop, or on the other hand to add general information about your PC.