In this tutorial you will figure out how to set/change server’s Completely Qualified Domain Name (FQDN) on Ubuntu 20.04 Central Fossa Linux server or desktop. A Update FQDN in Linux is an abbreviation for a completely qualified domain name.
Otherwise called an outright domain name. For instance, server1.cyberciti.biz is FQDN. It is essential for DNS. This page explains how to see, set/change FQDN on a Ubuntu Linux 20.04 LTS server or desktop framework.
A hostname is the name of updating Pirated Sims 4 that is associated with an organization. The hostname is utilized to distinguish the PC in the organization. It is additionally essential for the Completely Qualified Domain Name (FQDN), which is expected for some applications. Assuming you intend to set a FQDN during the installation of Plesk, for instance, this article can help.
The FQDN (Completely Qualified Domain Name) of the framework is the name that the resolver returns for the host name, for example, ursula.example.com. It is typically the hostname followed by the DNS domain name (the part after the principal speck). You can check the FQDN in Linux using hostname – – fqdn or the domain name using dnsdomainname.
Stage 1: Set the hostname
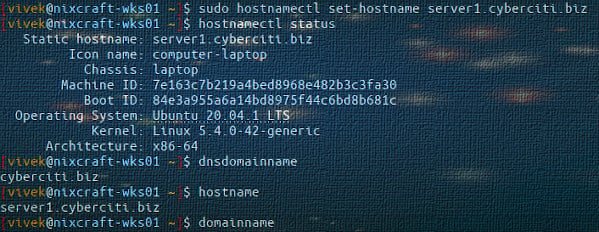
To check which hostname is presently set, enter the following order into the control center:
- hostname
The result presently shows:
- test1
For this situation, this is the hostname, which was set during arrangement in the gridscale board. This can now be changed to some other name – in this model, web1.
Open the “/and so on/hostname” document with an editor of your decision:
- sudo nano/and so on/hostname
supplant your current hostname with a new hostname of your decision, we will supplant our own with “Update FQDN in Linux”. Save your progressions with “Ctrl + O”, subsequent to confirming the filename with “Enter”, close nano with “Ctrl + X”. The change will produce results after the following restart – would it be a good idea for you believe that the progressions should occur without restarting, the following order will accomplish that:
- sudo hostname web1
Consideration: Changing the hostname with the order “sudo hostname web1” is not at all permanent and will be overwritten when rebooted. To roll out the improvement super durable, it is important to alter the/and so forth/hostname document. This isn’t a swap for the initial step.
Stage 2: Set the Completely Qualified Domain Name (FQDN)
In request to set the FQDN, the public IP of the server is expected, notwithstanding your own FQDN. For this situation, 123.123.123.123 is chosen for instance.
The FQDN is changed in the/and so forth/has document.
Open the document in any editor with root honors:
- sudo nano/and so on/has
The document ought to look something like this:
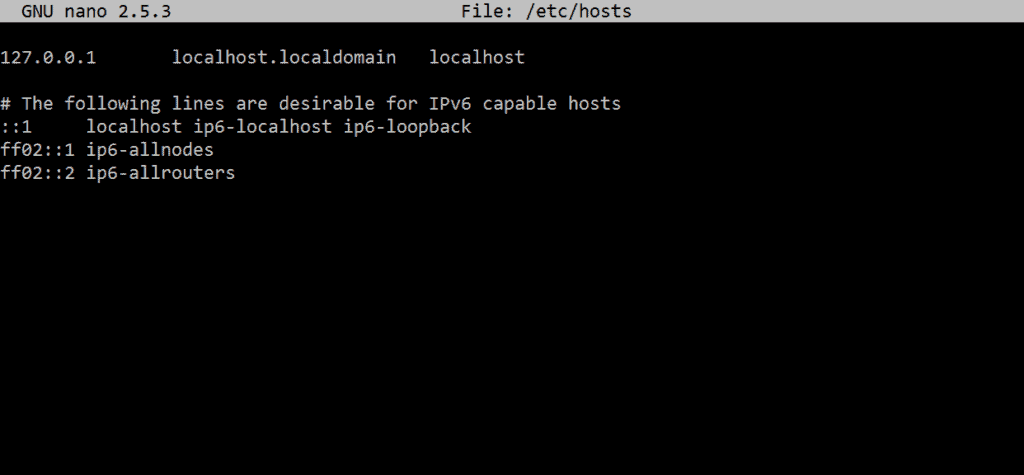
Presently the following lines will be set:
- 123.123.123.123 web1.gridscale.io web1
When finished, it ought to seem to be this:
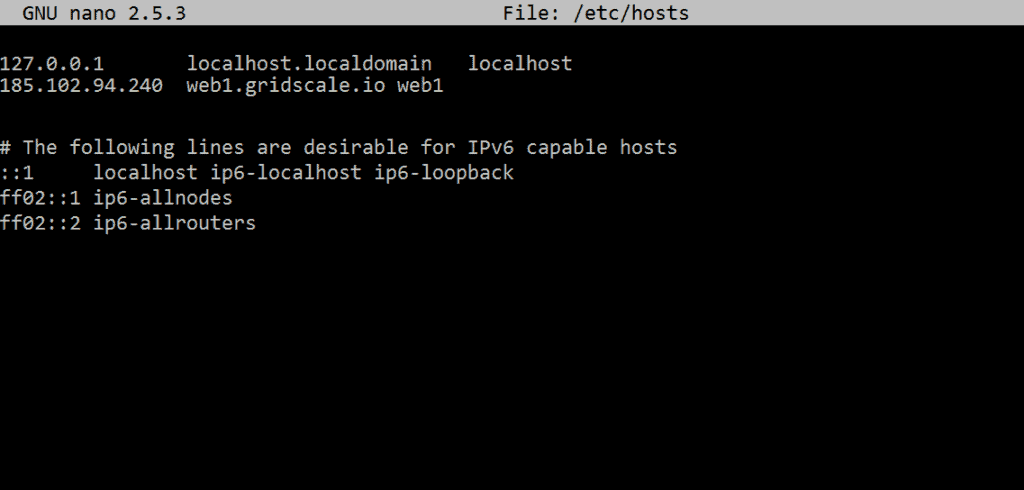
Make certain to save the progressions before the Update FQDN in Linux is checked with this order:
- hostname – f
The FQDN has now been set effectively and these progressions are super durable.
Testing DNS name goal
FQDN, for example, server1.cyberciti.biz, will possibly work assuming you update your DNS and point out to your Ubuntu server’s IPv4/IPv6. At the end of the day, set up DNS An and AAAA passages for server1.cyberciti.biz. Utilize the dig order or host order to test DNS server availability including FQDN:
- $ dig server1.cyberciti.biz
- $ have server1.cyberciti.biz
We can utilize the ping order to see network availability:
- $ ping server1.cyberciti.biz
Conclusion
We utilize the hostnamectl order to change the host name and Update FQDN in Linux so on/hostname document on Ubuntu Linux 20.04 LTS box.