Having a login screen is a typical sight these days for PCs, whether you’re utilizing a Remove Windows Login Screen. However, a login screen can be irritating since it implies an additional step you’ll need to take before you can utilize your PC.
Clearly, having a security framework like a login screen is perfect and valuable and energetically suggested in the event that you’re involving a PC in a public setting, utilizing a common Remove Windows.old Folder Windows 10, or on the other hand assuming your PC is being involved by numerous individuals in a similar home. In any case, imagine a scenario in which you’re the one in particular that at any point utilizes it.
Countless clients need to incapacitate login screen Windows 10. The login screen might irritate you each time your beginning your Windows 10 PC. How to impair login screen Windows 10? This post of MiniTool will walk you through itemized steps.
After Windows 10 impair login screen, you can boot into the Windows framework quicker and don’t need to enter the secret key each time. Thus, it is entirely reasonable for a virtual machine. How to Remove Windows Login Screen? Satisfy perusing the accompanying substance to know nitty gritty steps.
Disable Windows 10 Local Account Login
Method 1
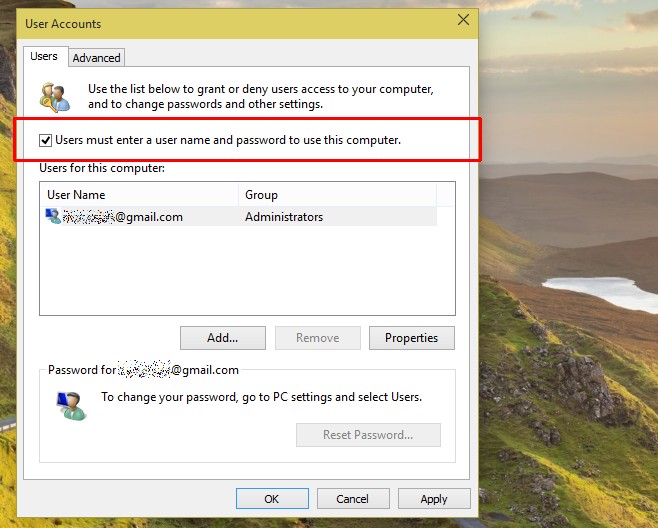
- Press the Windows Key + R
- Type in netplwiz
- Select the client account you need to incapacitate the login screen for
- Uncheck the container that says “Clients should enter a client name and secret word to utilize this PC”
- Enter the username and secret phrase that is related with the PC and snap OK. In any case, on the off chance that you never had a secret word set to start with, click OK.
Method 2
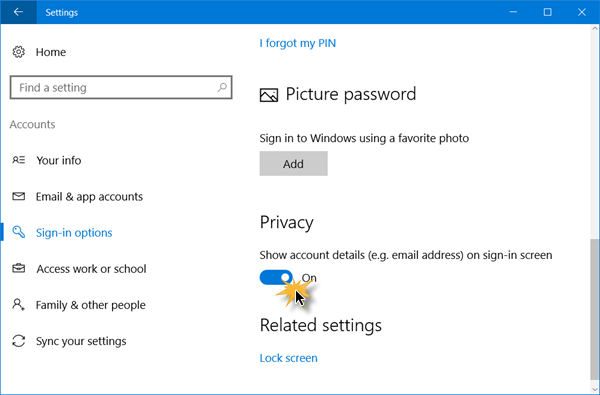
- Go to Settings
- Select Accounts
- Click on Sign-in choices
- Under “Require sign-in” select “Never”
Disable Windows 10 Microsoft Account Login
To keep your PC from provoking you for your Remove Windows Login Screen, you will initially have to change over your Microsoft account into a nearby record.
- Click on Start > Settings > Accounts
- Select Your email and records from the left sheet
- Click “Sign in with a nearby record all things considered” to send off the arrangement wizard
- Enter your Microsoft account qualifications first for check purposes
- Click Next
- Pick a username and secret key and snap Next
- Audit the data and assuming that no doubt about it, “Sign out and wrap up”
- Adhere to the guidelines in the “Impair Windows 10 Local Account Login” segment above to handicap the Windows 10 login screen
By and large, Windows 10 framework expects secret phrase to login for purpose of PC security. However, assuming you are the main individual who possesses the PC for home use, you can attempt to skip Windows 10 login screen. Then, at that point, when you start the PC, login screen is avoided and you appreciate quick Windows 10 startup.
Before do it, kindly ensure there is no framework secret word set for PC and you can get to PC. Assuming you forgot login secret word, take Windows 10 Password Genius to straightforwardly Remove Windows Login Screen Windows 10 login secret key for logon.
How would I remove the lock screen on Windows 10?
Select “Authoritative Templates” and afterward double tap “Control Panel.” Now, double tap “Personalization.” Double-click “Don’t Display the Lock Screen” and afterward select “Empowered” on the spring up menu. Click “Alright” when you’re finished.
How could I at any point skirt the login screen in Windows 10?
Click on the client represent which you wish to skip login screen in Windows 10 and remove the tick from the checkbox close to “Clients should enter a username and secret word to utilize this PC”.
How would I switch off lock screen on Windows 11?
Explore to Computer Configuration > Administrative Templates > Control Panel > Personalization. Double tap on the Do not show the lock screen choice in the Personalization choices. Another window with point by point settings for the choice will open.