Windows Updates can come up short for different reasons. From low plate space to Remove Windows Failed Updates, it can take you hours to figure out what turned out badly. So rather than attempting to make sure about the reason, it is smarter to tidy up your PC and restart the update.
Windows 10 keeps a log of all updates that you perform either automatically or physically. It couldn’t care less on the off chance that these updates were introduced effectively or failed, it simply keeps a log of these updates. Along these lines, even the failed updates occupy some room on your hard drive. In this article, we will make sense of the technique you can use to erase the Remove Windows Failed Updates.
At the point when your PC endeavors to download and put in new updates for its product applications or working framework, it stores a definite log of each update. On the off chance that any of the updates neglect to introduce appropriately, they are noted in the “Automatic Updates” history log. There is no immediate method for getting this log free from failed updates, however you can clear its items by physically erasing the update information.
Erase Failed Updates in Windows 10
To erase the Remove Windows Hello For Business Pin, you should play out the accompanying advances:
Type control board in the pursuit part of your taskbar and click on the query output to send off the control board window. The recently opened Control Panel window is shown in the accompanying picture:
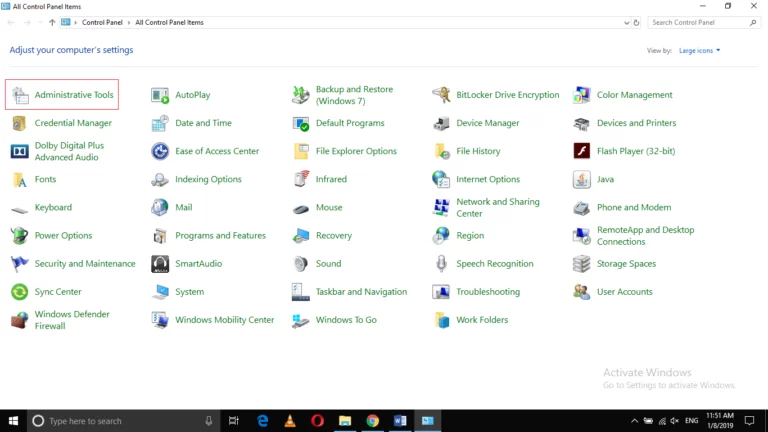
Click on the Administrative Tools organizer as featured in the picture shown previously.
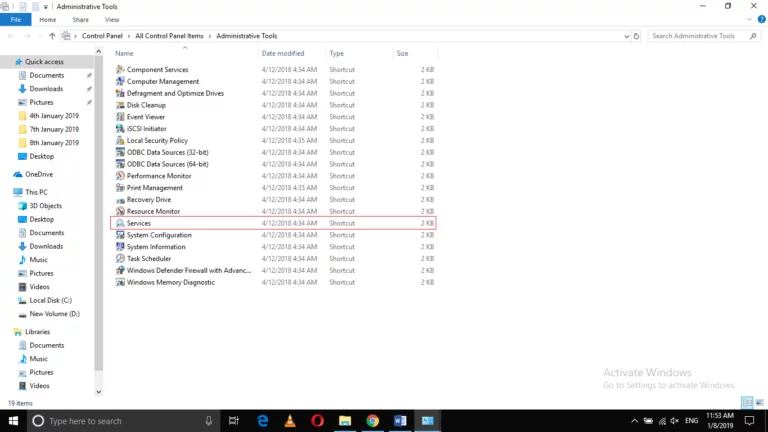
In the Administrative Tools window, click on the Services organizer as featured in the picture shown beneath:
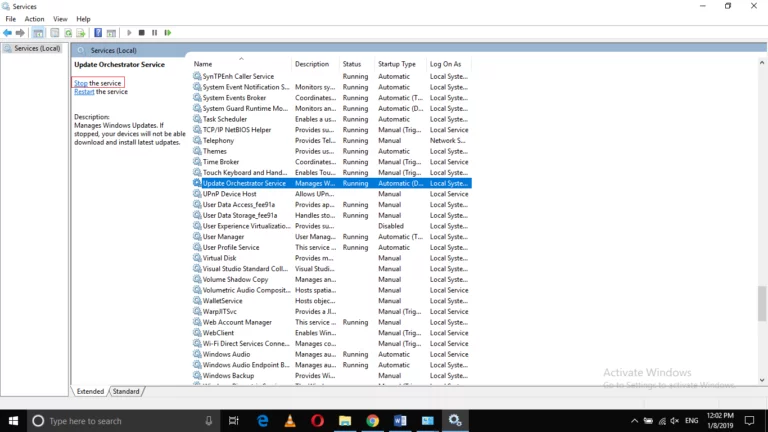
In the Services window, click on the Update Orchestrator Service to choose it and afterward click on the Stop the Service connect as featured in the accompanying picture to stop the updates for some time until you erase the failed updates.
Presently type record voyager in the pursuit segment of your taskbar and click on the query output to send off the document adventurer window. The recently opened File Explorer window is shown in the picture underneath:
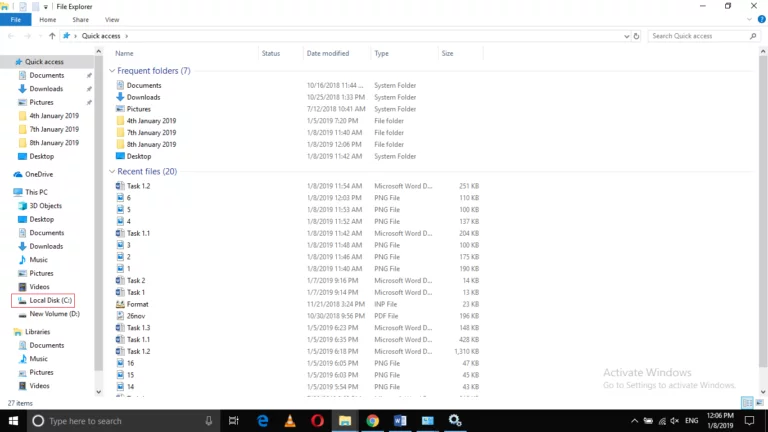
Click on the C drive symbol as featured in the picture shown previously.
Run Deployment Image Servicing and Management
The following thing that you want to do is output and fix degenerate framework parts. Degenerate framework parts are one of the significant motivations behind why updates fall flat, so it is smarter to find and fix them prior to endeavoring to refresh once more.
To begin the cycle, fire up a Command Prompt window by composing Command Prompt in the Remove Windows Failed Updates search bar, right-clicking, and squeezing Run as administrator.
In the Command Prompt window, type DISM/on the web/cleanup-picture/restorehealth and press enter. After squeezing enter, DISM will begin filtering Windows Component Store documents for debasement and will attempt to fix the adulterated parts.
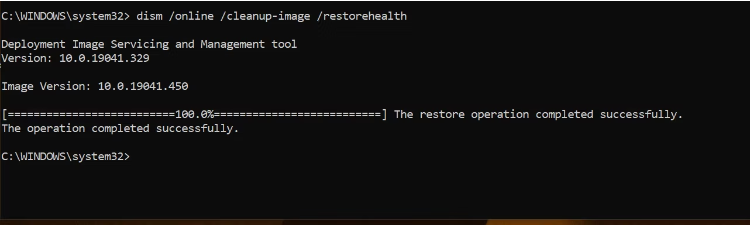
Running a DISM examine prior to continuing on toward the System File Checker (SFC) filter is significant in light of the fact that SFC depends on the Windows Component Store of the Windows picture that you are running. Assuming the part store is itself bad, SFC won’t work.
Thus, run DISM to ensure that when you really want to run SFC, you can do as such with practically no issues.
When DISM gets done with running, you can continue on.
Run a System File Checker Scan
Where DISM outputs and fixes framework parts, System File Checker (SFC) filters Windows framework documents that are bad and attempts to fix them by supplanting them with stable forms from the Remove Windows Failed Updates part store.
The interaction for running SFC is practically equivalent to DISM. Very much like previously, fire up a Command Prompt window with regulatory honors. Then, at that point, type SFC/scannow and press enter.
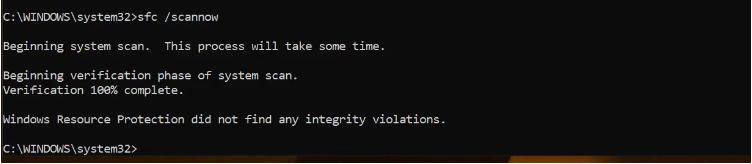
Allow SFC to do its thing and when it wraps up, restart your PC.
Pause Windows Updates
Subsequent to finding and fixing any part and record mistakes, the following thing to do is erase old update documents.
Windows Updates are a wreck which is the reason a great many people aren’t moving up to more current Remove Windows Failed Updates. One reason they are such a wreck is that various updates can make clashes that lead to failed updates.
A straightforward fix to determine these contentions is to erase currently downloaded updates and rerun the cycle.
One method for erasing downloaded updates is to respite and afterward un-stop the updates. Remove Windows Failed Updates will erase the downloaded update documents assuming you stop automatic updates.
- To do this, press Windows key + I to open Settings, then head to Update and Security > Windows Updates > Advanced choices.
- Under Pause updates, in the Advanced choices, select a date that you need to stop the updates for. For instance, select a date for the following day.
- Subsequent to choosing the date, restart your PC. Windows will continue the updates following one day and will wipe away every one of the downloaded updates.
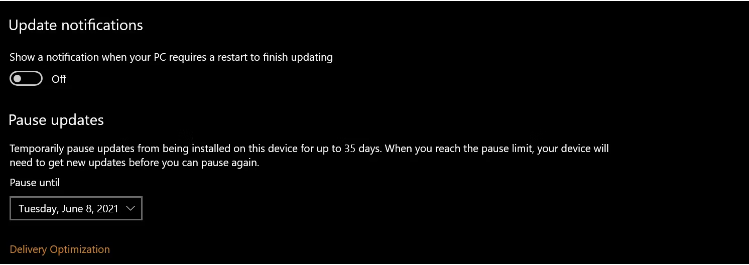
When the updates continue, you can re-download the documents and attempt once more.
Conclusion
Utilizing this tutorial, you can without much of a stretch erase the Remove Windows Failed Updates. This will free up a sufficient measure of your hard circle space. To change Windows 10 Update settings, examine.