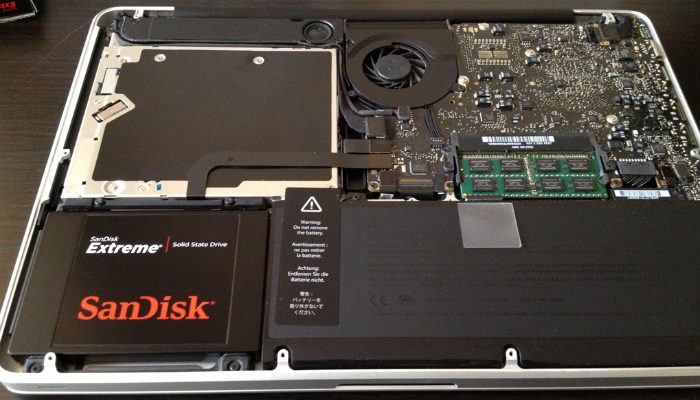
The most effective way to extend your Mac’s life expectancy and get a critical speed support is by supplanting the hard drive with a strong state drive (SSD). You’ll see the enormous exhibition improvement right from whenever you first boot up and promptly acclaim yourself for making this speculation.
However, you shouldn’t stop at introducing another SSD. There is one minuscule order line you should type into Enable Trim on SSD Mac a component intended to grow the life expectancy of the recently introduced drive; this element is called TRIM.
Macs only enable TRIM for the Apple-furnished strong state drives they accompany. In the event that you overhaul your Mac with a reseller’s exchange SSD, your Mac won’t utilize modere trim review with it. This decreases the drive’s presentation. Because of Mac OS X 10.10.4, empowering TRIM on any SSD in your Mac with a straightforward command is currently conceivable. You never again need to incapacitate OS X’s security includes and adjust your framework to do this.
Assuming that you have supplanted the hard drive on your Mac with a SSD, you definitely know how a lot quicker your PC is. However, I will show you how to keep away from this one basic mix-up that so many of us make while introducing another SSD. As a matter of course, Mac OS, in contrast to Windows, doesn’t Enable Trim on SSD Mac the TRIM order for a self-introduced SSD.
What Is TRIM, and Why Do You Need It?
Keeping in touch with a SSD is totally unique in relation to keeping in touch with a traditional hard drive: the SSD first cleans existing information off of the blaze memory cells and projects new information into them; consequently, the creative cycle is frequently alluded as program/delete cycles or P/E cycles.
There is one thing to note, however, and that will be that there are a set number of Enable Trim on SSD Mac can uphold. Keeping in touch with a SSD resembles composing on a piece of paper with a pencil: in the event that you eradicate similar space too commonly, it can break down. Makers address this issue with supposed wear evening out, which forestalls SSD memory cells (the pages) from breaking down.

SSDs contain memory cells coordinated into pages and blocks. What addresses a test is that with a SSD you can compose on a page any time, yet you can eradicate only one block at a time. Each block contains a predetermined number of pages (from 32 to 256), which contain a predefined measure of information (2 to 8KB).
Not at all like traditional hard drives, information on SSDs can’t be straightforwardly overwritten. At the point when information transforms, it should be composed once more. Similar information (and metadata) turns out to be composed again and again in our day to day utilization of PCs creating a phenomenon called compose amplification, which goes through the restricted P/E cycles.
Back Up Your Mac Before Enabling the TRIM Command
You want to enable trimming physically while introducing an outsider SSD. All Macs transported with a SSD have TRIM enabled, however, and yours can be checked by tapping on the Apple logo > About This Mac > System Report > SATA/SATA Express and search for “Trim Support”. Note that this won’t chip away at Retina MacBook Pro (late 2016) units.
In the event that the response here is “no” and you are running either macOS El Capitan 10.11.x or macOS Yosemite 10.10.4 or later versions, then, at that point, Enable Trim on SSD Mac with one straightforward order in Terminal. Prior versions of macOS don’t uphold this order, yet there are outsider applications, like TRIM Enabler ($14.99), that can enable it.
Before you enable TRIM on the newly introduced SSD, we strongly suggest doing a manual reinforcement with Time Machine (or the reinforcement administration of your inclination). Try not to skirt this step, in light of the fact that – regardless of supporting it – Apple gets a sense of ownership with information misfortune during the cycle. In the case of anything turns out badly, the information will actually want and you won’t have the option to recuperate it, so a reinforcement can make all the difference.
How to Enable TRIM on macOS in Five Easy Steps
To grow the life expectancy of your SSD, follow the means beneath:
- Send off Terminal.
- Type the order sudo trimforce enable, and press enter.
- Type the administrator secret key, and press enter.
- Peruse the framework notice, type “y”, and press enter.
- macOS will require your consent to reboot subsequent to completing the interaction, so type “y” once more, and press enter.
Subsequent to completing the interaction your Mac will reboot with Enable Trim on SSD Mac. Check once more assuming that TRIM help is presently “Alright” by tapping on the Apple logo > About this Mac > System Report > SATA/SATA Express, or by composing the accompanying order in terminal: