In the days of yore, when Intel and other chip producers used to mark their processors using their gigahertz speeds and higher the number used to mean Check Processor Generation in Windows 10. However, on the grounds that hertz are not a genuine indicators of the presentation of a processor, Intel changed its chips name plot with the Core series to move their marketing away from recurrence.
If you have any desire to purchase another PC or laptop, it’s useful to understand what CPU you have and how quick it is, or what generation is your Intel processor in Windows. In this article, you will figure out how to Check Processor Generation in Windows 10, beneath you will find 2 methods for doing that.
The CPU is one of the factors we consider while purchasing a PC since it informs us about what the PC should or shouldn’t do. Additionally, you could require such information assuming you really want to fix an issue on your PC to check for its similarity. Most of PC CPUs come from Intel, yet a few PCs likewise use AMD and Qualcomm.
To find this information in the Windows 10 or Windows 11 Settings application, explore to Settings > System > About. Look under “Gadget particulars.” The name of your Best Gaming TVs and its speed are shown to one side of “Processor.”
2 Ways to Check the Generation of your PC or Laptop on Windows 10
Here, I’ll show you 2 unique ways which you can use to be aware and find the generation of a laptop or PC.
1. How to Know the Generation of your Laptop or PC through Properties
In the event that you have a laptop or desktop framework running Windows 7 or above, you can Check Processor Generation in Windows 10 of your Intel processor by following the underneath steps:
You can check or find it by basically right-clicking on My Computer and selecting Properties and You will get an outline perspective on the presently designed equipment and operating framework. This information includes the processor that you are running, however the processor is referenced by its deals/marketing name.
- Right-click on My Computer or This PC and tap on Properties.
- Presently, you can see your processor and the main number after i3, i5, or i7 is essentially the generation of your laptop or PC. For instance, in here, my current chipset is the i5, seventh generation Under the System area. In the screen capture beneath, seventh is the number after i5 in this way, the generation of my laptop or PC is seventh.
This number can be from 1 to 9. This indicates your generation can be anything from 1 to 9.

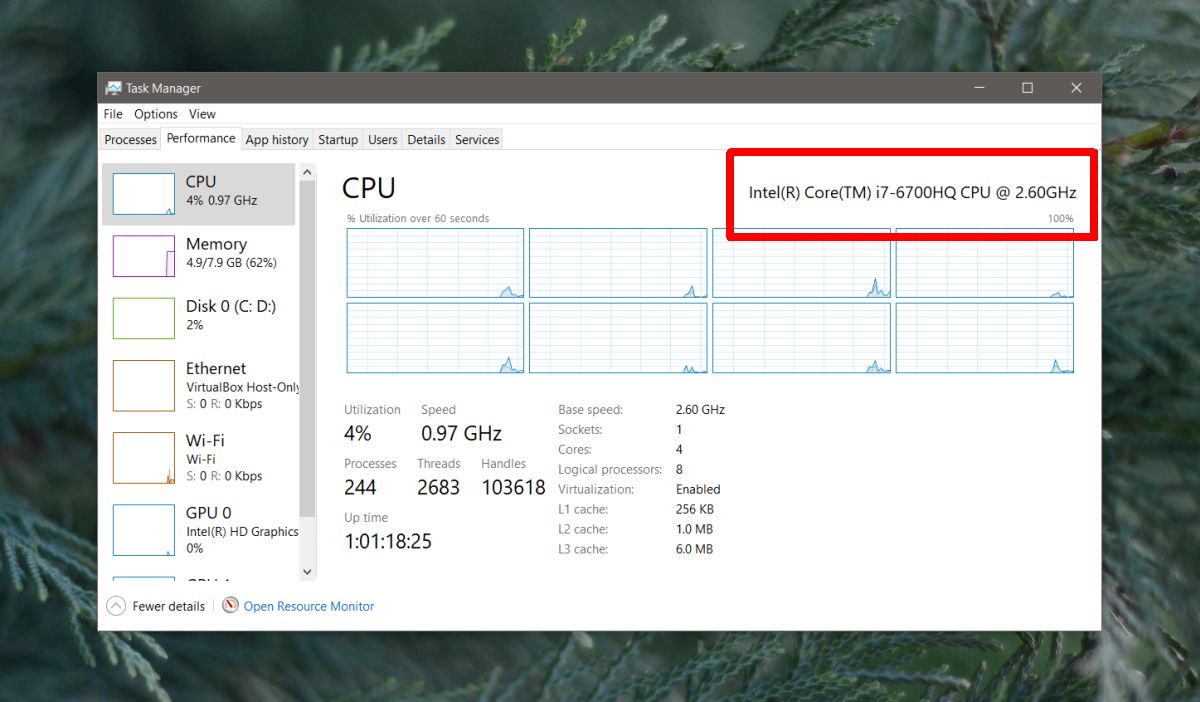
2. How to Find the Generation of a Laptop or PC using the Task Manager
You can find point by point CPU information like the Check Processor Generation in Windows 10 and a lot more in Windows 10’s Task Manager. To find that Right-click on your taskbar and select “Assignment Manager” or essentially use Ctrl+Shift+Esc to send off it. Tap on the “Execution” tab and pick “Central processor.” The name and speed of your PC’s CPU will show up here.
This is the way to check the generation of your laptop using Task Manager in Windows 10:
- To begin, right-click your taskbar and select Task Manager.
- Then, tap on the Performance tab and snap on CPU. Here you can find the subtleties of the Intel Processor and Generation. For instance, in the screen capture underneath, seventh is the number after i5 basically is the generation of my laptop or PC.

Conclusion
These are 2 methods for finding or Check Processor Generation in Windows 10 of your PC or laptop by using the PC Properties and Task Manager. You can get itemized information about your PC and laptop. It would be useful to be familiar with Intel’s processors and generations, particularly on the off chance that you’re looking to purchase a PC or laptop, or on the other hand to add general information about your PC.